Types of Spherical Lenses
Definition: A piece of a transparent medium bounded by at least one spherical surface, is called a spherical lens.
An optical lens is made of transparent material such as glass or clear plastic. One or both surfaces usually have a spherical curve.
There are two types of lenses, converging and diverging lenses.
A converging lens is called a convex lens. It is thicker at the centre than at the edges.
A diverging lens is called a concave lens. It is thinner at the centre than at the edges.
Convex or Converging Lenses: These are thick in the middle and thin at the edges.
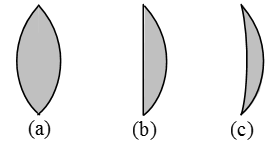
Fig. Three types of convex lenses
(a) Double Convex Lens: It has both the surfaces convex.
(b) Plano–Convex Lens: It has one surface plane and the other surface convex.
(c) Concavo–Convex Lens: It has one surface concave and the other surface convex.
Concave or Diverging Lenses: These are thin in the middle and thick at the edges.
There are three types of concave lenses

Fig. Three types of concave lenses
(a) Double Concave Lens: It has both the surfaces concave.
(b) Plano–Concave Lens: It has one surface plane and the other surface concave.
(c) Convexo–Concave Lens: It has one surface convex and the other surface concave.
Some Associated Terms:
- Centre of curvature (C):
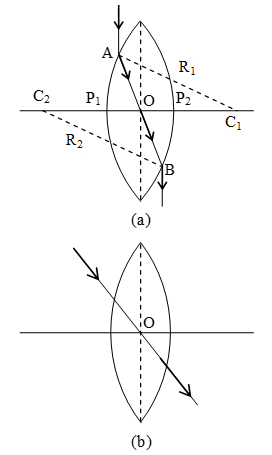
The centre of curvature of the surface of a lens is the centre of the sphere of which it forms a part, because a lens has two surfaces, so it has two centres of curvature. In figure (a) and (b) points, C1 and C2 are the centres of curvature. - Radius of curvature (R):
The radius of curvature of the surface of a lens is the radius of the sphere of which the surface forms a part. R1 and R2 in the figure (a) and (b) represents radius of curvature. - Principal axis (C1C2):
It is the line passing through the two centres of curvature (C1 and C2) of the lens.
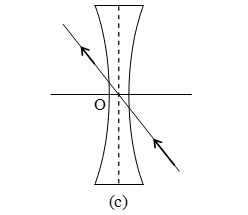
Figure : Characteristics of convex and concave lenses - Optical centre:
If a ray of light is incident on a lens such that after refraction through the lens the emergent ray is parallel to the incident ray, then the point at which the refracted ray intersects, the principal axis is called the optical centre of the lens.
\(\frac{O{{P}_{1}}}{O{{P}_{2}}}=\frac{{{P}_{1}}{{C}_{1}}}{{{P}_{2}}{{C}_{2}}}=\frac{{{R}_{1}}}{{{R}_{2}}}\)
If the radii of curvature of the two surfaces are equal, then the optical centre coincides with the geometric centre of the lens.
- Principal foci and focal length:
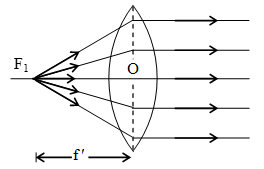
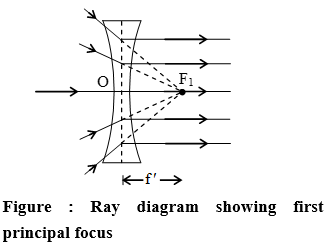
(A) First principal focus and first focal length:
It is a fixed point on the principal axis such that rays starting from this point (in convex lens) or appearing to go towards this point (concave lens), after refraction through the lens, become parallel to the principal axis. It is represented by F1.
(B) Second principal focus and second focal length:
It is a fixed point on the principal axis such that the light rays incident parallel to the principal axis, after refraction through the lens, either converge to this point (in convex lens) or appear to diverge from this point (in concave lens). It is denoted by F2.

If the medium on both sides of a lens is same, then the numerical values of the first and second focal lengths are equal. Thus f = f’ - Aperture:
It is the diameter of the circular boundary of the lens.
People also ask
- What is a Lens?
- What is the thin lens equation?
- Lens Formula & Magnification – Lens Power
- Image Formation By Concave And Convex Lenses
- The Uses of Lenses in Optical Devices
- To Construct Optical Devices Using Lenses
Focal Point and Focal Length of a Lens
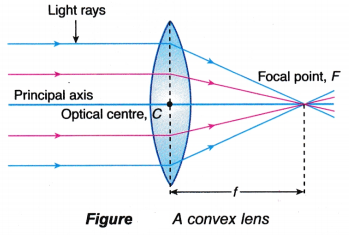
- For a convex lens, light rays parallel and close to the principal axis are refracted inwards and converge to a focal point, F after passing through the lens.
- For a concave lens, light rays parallel and close to the principal axis are refracted outwards and appear to diverge from the focal point, F after passing through the lens.
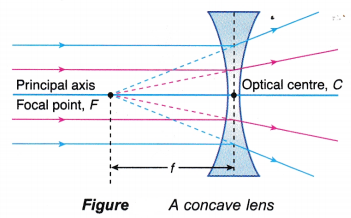
- The focal point, F is a common point on the principal axis where all rays close and parallel to the axis converge to it after passing through a convex lens, or appear to diverge from it after passing through a concave lens.
- The focal length, f of a lens is the distance between the focal point and the optical centre of the lens.
- For a convex lens, the thicker the lens is at the centre, the shorter is the focal length of the lens.
- For a concave lens, the thinner the lens is at the centre, the shorter is the focal length of the lens.
Ray Diagram for Convex and Concave Lens
The nature of the image formed by a convex lens varies as the distance of the object from the lens changes. However, with a concave lens, we always get virtual, upright, and diminished images (regardless of the distance of the object from the lens).
Fig. Diagrammatic representation of images formed by lenses
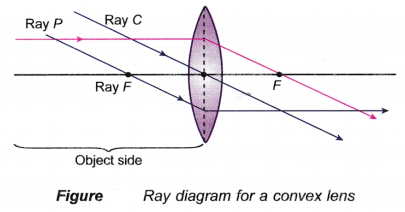
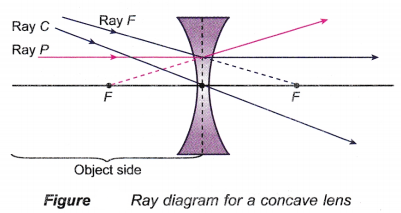
- The characteristics of the image formed by a lens can be determined by drawing a ray diagram using three key rays, ray P, ray C and ray F.
(a) Ray P:
An incident ray, parallel to the principal axis. Passes through the focal point, F on the opposite side of a convex lens after refraction. Whereas, for the case of a concave lens, it appears to diverge from the focal point, F on the objects side.
(b) Ray C:
A chief ray or central ray that passes through the optical centre of a lens and travels straight on without bending.
(c) Ray E
A focal ray that passes through the focal point, F on the objects side of a convex lens, or appears to pass through the focal point, F on the opposite side of a concave lens. After refraction, the ray is parallel to the principal axis. - Figure shows the three key rays used in the construction of a ray diagram for a convex lens.
- Figure shows the three key rays used in the construction of a ray diagram for a concave lens.
- The image formed by a convex lens can be seen on the screen. If the screen is removed, the image is seen in the air where the screen was placed. This shows that the image is real.
- If the image formed can be seen but cannot be captured on a screen, the image is virtual.
- The characteristics and position of the image formed changes with the position of the object or distance of the object from the lens.
Steps for Drawing Ray Diagrams
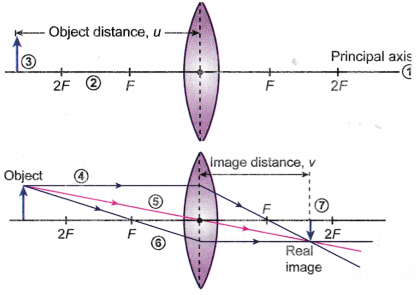
The following steps are used to draw a ray diagram for a convex lens.
- Step 1: Draw a straight line as the principal axis and a curved line as the convex lens.
- Step 2: Mark the positions of the optical centre, focal point, F and 2F.
- Step 3: Draw an arrow as the object standing upright on the axis at a given distance.
- Step 4: Draw ray P coming from the top of the object, passing through the focal point, F on the opposite side.
- Step 5: Draw ray C coming from the top of the object, passing through the optical centre in a straight line.
- Step 6: Draw ray F coming from the top of the object, passing through the focal point, F on the object’s side. The ray becomes parallel to the axis on the opposite side.
- Step 7: Draw the image of the arrow with its tail on the axis. The head of the arrow is the point where any two refracted rays meet. The image is real.
- The characteristics of the image formed can be:
(a) real or virtual,
(b) inverted or upright,
(c) magnified, diminished or of the same size. - The ray diagram in Figure shows the characteristics and position of the image formed by a concave lens.
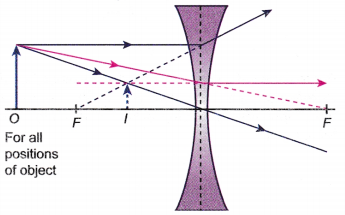
- The image formed by a concave lens is always virtual, upright and diminished.
- The image is on the same side of the lens and between the object and the lens.